How To Spin Up An AWS Windows Instance Using Vagrant, Packer and AWS

Introduction

The aim of this article is to take your from having nothing installed on your local Windows machine to being able to spin up an an AWS Windows instance which has Sql server CE installed using Vagrant, Packer and Chef. This tutorial makes the assumption you are using a Windows machine to install the software below.

The tutorial is split into two parts. Part one focuses on creating a customized Windows image which allows us to install software to the machine using Chef. This is referred to as an AMI (Amazon Machine Image). Part two focuses on spinning up an AWS instance using that AMI and installing Microsoft Sql Server using the Chef component which we baked into the AMI.

Before I start I would like to thank the author of the base document of which I built my knowledge on:

http://engineering.daptiv.com/provisioning-windows-instances-with-packer-vagrant-and-chef-in-aws/

Whilst this gave me the basics, there were a few key modifications and additional steps required to actually get the instance up and running which I have documented here.

Disclaimer

The instance created only has very basic security policies in place and would require changes in order to make this production secure. The purpose of this tutorial is to focus on the getting the instance up and running as opposed to making it production ready

Prerequisites

You will need to install the following:


Explanation of software installed

AWS : Amazon web services: used to host to windows instance you have created
Vagrant software: used to specify the configuration of the machine to create in AWS
Packer: additional software required to create a using AMI (Amazon Machine Image) in AWS
Sublime: text editor to make changes to Vagrant files, Packer files and configuration settings

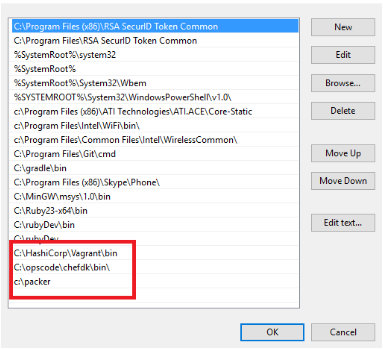
Customizing the PATH variable

We need to be able to use the software we have installed at the command prompt. In order to do this we must ensure the application directories have been added to the PATH variable. If you’re unfamiliar with editing your windows PATH variable you can find a tutorial here:

http://www.computerhope.com/issues/ch000549.htm
Once you have made the changes your PATH variable should look something similar to this (Windows 10):

1


Customizing the software:

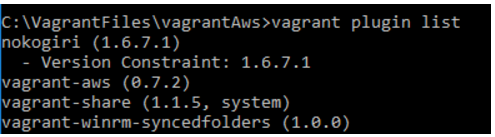
Vagrant by default is not set up to spin up instances in AWS. We need to install a number of plugins before it is ready to use. Open a command prompt and type the following command:

Vagrant plugin list

This will show the following plugins installed by default. We need to install the following plugins and remove some existing plugins in order for this process to work

Plugins to install:

Nokogiri (1.6.7.1) See notes below before installing
Vagrant-aws See notes before to install
vagrant-share
vagrant-winrm-syncedfolders
Plugins to remove:

Any references to berkshelf


To install a plugin type the following command:

Vagrant plugin install [name of plugin with no brackets]

E.g. vagrant plugin install vagrant-share


Notes on installing vagrant-aws plugin:

At the time of writing Vagrant was not working through the plugin install method so you will have to download and install it manually. This can be done by:

  • Navigating to rubygems.org (https://rubygems.org/gems/vagrant-aws)
  • Click the download link
  • Open a command prompt and type vagrant plugin install /path/to/my-plugin.gem (e.g. c:\awsTest\awsPlugin.gem)


If your windows user home directory name contains spaces then you will receive an error asking you to move your Vagrant Home folder to a location without spaces. This can be done following these instructions (https://issues.jboss.org/browse/JBDS-3653)


To remove a plugin type the following command:

Vagrant plugin uninstall [name of plugin with no brackets]


A Note on Nokogiri:

In order to install this plugin successfully you will need to make some changes to the Vagrant configuration itself. You will need to edit the following Vagrant configuration files:

vagrant.gemspec and vagrant-1.8.1.gemspec

These can be located in the following location (if you installed Vagrant in the default location):

C:\HashiCorp\Vagrant\embedded\gems\specifications

In the files locate any reference to nokogiri and change to reference to:

s.add_runtime_dependency(%q<nokogiri>, [“>= 1.6.3.1”])

Once you have saved your changes you can then install the plugin as standard:

Vagrant plugin install nokogiri

By the end of adding and removing plugins you should have the following plugins installed:

d1

If you have the following error on installing any of the plugins:

[ error to resolve with aws plugin: Could not find gem ‘vargrant-aws x86-mingw32’ in any of the gem sources listed in your Gemfile or available on this machine.]
Make sure you check your spelling of the plugin as this can cause issues
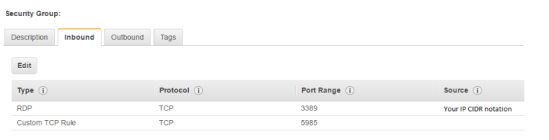
Setting Up AWS

A security group defines what and who can and cannot access your Amazon instance. We need to ensure this group allows WinRM access. This is the protocol required for your local machine to talk to the AWS instance in order to issue commands. Non Windows AWS commands use SSH to communicate. Windows AWS instances use WinRM


You need to create a new inbound rule with the following details:

Type: Custom TCP rule
Protocol: TCP
Port Range: 5985
Source: select myIP – This is your publicly available IP address

Type: RDP
Protocol: TCP
Port Range: 3389
Source ip: your publicly available ip address in the same format as above


You should also select the VPC as default for ease of use for this tutorial.


Your security rule should look something like this:

d1

Creating the Packer file

Packer is responsible creating an AMI which we can then use Vagrant to spin up an instance from. We cannot by default spin up the Amazon Windows instances that are already available as they lack certain configuration settings for WinRM and do not have Chef installed (to allow us to install more software onto the box)

First we need to create a packer file. Create the following file: aws.json in the folder where you have installed Packer and open it with your text editor. Next paste the following information into the file

{
  "builders": [{
    "type": "amazon-ebs",
    "region": "ENTER_REGION_HERE",
    "instance_type": "t2.micro",
    "source_ami": "ENTER_SOURCE_AMI_HERE",
    "ami_name": "windows-ami-01",
    "user_data_file": "bootstrap-aws.txt",
    "communicator": "winrm",
    "winrm_username": "Administrator",
    "winrm_password": "ENTER_AT_LEAST_18_DIGITS_NUMBERS_LETTERS_SYMBOLS",
    "winrm_timeout": "4h",
    "subnet_id": "ENTER_SUBNET_ID_HERE",
    "security_group_id": "ENTER_SECURITY_GROUP_HERE",
    "access_key": "ENTER_ACCESS_KEY_HERE",
    "secret_key": "ENTER_SECRET_KEY_HERE"
  }],
  "provisioners": [{
    "type": "powershell",
    "scripts": [
      "install-chef.ps1"
    ]
  }]
}

Let’s talk through the fields you will need to populate with your own data.

ENTER_REGION_HERE: This is where you specify the Amazon region of where to spin up the AWS instance. It’s recommended you spin up an instance closest to you for geographical latency. At the time of writing the regions you can enter are: (enter only one)

US East (N. Virginia) us-east-1
US West (N. California) us-west-1
US West (Oregon) us-west-2
Asia Pacific (Mumbai) ap-south-1
Asia Pacific (Seoul) ap-northeast-2
Asia Pacific (Singapore) ap-southeast-1
Asia Pacific (Sydney) ap-southeast-2
Asia Pacific (Tokyo) ap-northeast-1
EU (Frankfurt) eu-central-1
EU (Ireland) eu-west-1
South America (São Paulo) sa-east-1

For example to select EU (Frankfurt) you should enter the following in the region field: eu-central-1

ENTER_SOURCE_AMI_HERE: This is where you enter the source base Amazon image you wish to customize. Here you need to enter the the current id of the Windows Server 2012 R2 Base image. This can be found by logging into AWS -> Selecting EC2 Under the compute section -> Selecting launch instance. This will provide you a list of AMI’s. In the packer file enter the id on the Windows server image:
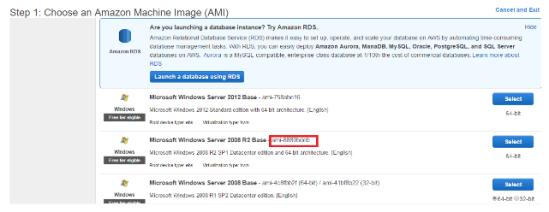
d1


E.g ami-XXXXXX

User data file explained:

This allows us to execute commands the first time the AWS instance spins up. Create a file called bootstrap-aws.txt in the same folder as the Packer folder. Paste the following text into the file:

<powershell>
# set administrator password
net user Administrator Kopfwokfewpokfweksalkdsokdsokkokpfs111#
wmic useraccount where "name='Administrator'" set PasswordExpires=FALSE

# configure WinRM
winrm quickconfig -q  
winrm set winrm/config/winrs '@{MaxMemoryPerShellMB="0"}'  
winrm set winrm/config '@{MaxTimeoutms="7200000"}'  
winrm set winrm/config/service '@{AllowUnencrypted="true"}'  
winrm set winrm/config/service/auth '@{Basic="true"}'

netsh advfirewall firewall add rule name="WinRM 5985" protocol=TCP dir=in localport=5985 action=allow

net stop winrm  
sc config winrm start=auto  
net start winrm

# turn off PowerShell execution policy restrictions
Set-ExecutionPolicy -ExecutionPolicy Bypass -Scope LocalMachine

</powershell>


This file is overriding some of the default behavior which is associated with AWS and the base AMI we have selected. Firstly it is overriding the Administrator password of the image allowing us to login if to diagnose any issues. Next it is overriding some of the default settings of WinRM and then restarting the service. Finally it is disabling some of the Powershell restrictions that would normally be associated with this base image.

WinRM Password: This must be the same password you have just put in the user data file. Otherwise WinRM will not be able to connect to the instance.

ENTER_SUBNET_ID_HERE: Your default VPC will have set up a number of subnets to connect to different availability zones. You will need to select one only.


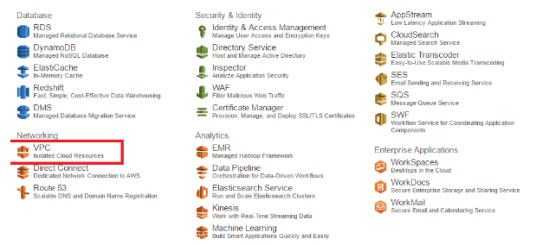
First go to to the AWS dashboard and select VPC:

d1


Next Select Subnets:

d1

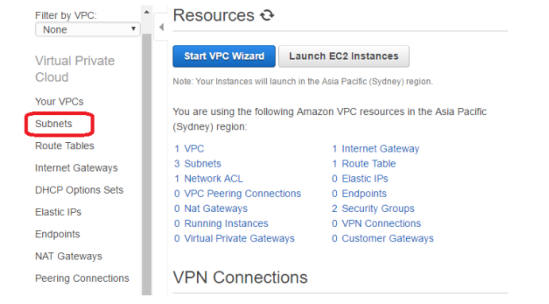
From here you can use the id of the subnets created:

d1


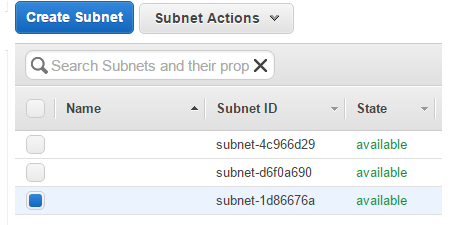
I would recommend entering the first Subnet ID into your packer file providing that when it’s selected the details below show the VPC ID which is tied to the security group ID you’re about to enter into the packer file.


ENTER_SECURITY_GROUP_HERE: Enter the security group id you created earlier in the tutorial. This can be found by going to the EC2 Dashboard -> Security Groups

The ID should start with sg-XXXXX

ENTER_ACCESS_KEY_HERE:

ENTER_SECRET_KEY_HERE:

The access key and the secret key provide a security layer to ensure an authorized machine is communicating with the AWS instance.

To create and Access key and Secret key you can use the AWS documentation here:

http://docs.aws.amazon.com/AWSSimpleQueueService/latest/SQSGettingStartedGuide/AWSCredentials.html


Once you have created a user with an access and secret key you will need to edit their permissions to enable them to create instances. Select the user and then select the permissions tab.Then click attach a policy:

d1


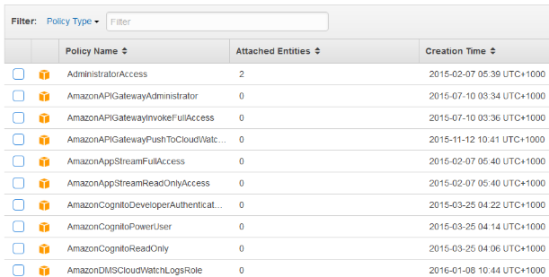
For the sake of simplicity of the demo I would recommend the AdministratorAccess role.

The Provisioners section:

Let’s examine this section of the Packer script in more detail:


  "provisioners": [{
    "type": "powershell",
    "scripts": [
      "Install-chef.ps1"


Once the AWS instance is up and running it will execute a PowerShell script called install-chef.ps1. This is our script that we will now create to allow as to install Chef onto the AWS instance. Create a file in same folder as the Packer script you have just created and call it install-chef.ps1. Open the file and paste in the following contents:


  $download_url = 'https://opscode-omnibus-packages.s3.amazonaws.com/windows/2008r2/i386/chef-client-12.4.2-1-x86.msi'
(New-Object System.Net.WebClient).DownloadFile($download_url, 'C:\\Windows\\Temp\\chef.msi')
Start-Process 'msiexec' -ArgumentList '/qb /i C:\\Windows\\Temp\\chef.msi' -NoNewWindow -Wait

Save and close the file.

The script explained:

The script creates a variable called download_url which informs the AWS instance of the download location of the Chef Client application. Next a new file is created on the AWS instance called chef.msi which the contents will be populated from the download_url variable. Finally msiexec is called to execute the newly download msi with the argument to bypass any user input whilst installing ( -NoNewWindow -Wait)

We’re now ready to execute the script! To do this open a command line prompt, navigate to to the Packer folder and type:

packer build aws.json

You should then see the following output:

  C:\packer>packer build aws.json
amazon-ebs output will be in this color.

==> amazon-ebs: Prevalidating AMI Name...
==> amazon-ebs: Inspecting the source AMI...
==> amazon-ebs: Creating temporary keypair: packer 57e6ef5c-e5ce-aa68-d8bb-d
f8f9725
==> amazon-ebs: Launching a source AWS instance...
    amazon-ebs: Instance ID: i-008fddf28eb2a36e5
==> amazon-ebs: Waiting for instance (i-008fddf28eb2a36e5) to become ready..
==> amazon-ebs: Skipping waiting for password since WinRM password set...
==> amazon-ebs: Waiting for WinRM to become available...
==> amazon-ebs: Connected to WinRM!
==> amazon-ebs: Provisioning with Powershell...
==> amazon-ebs: Provisioning with shell script: install-chef.ps1
==> amazon-ebs: Stopping the source instance...
==> amazon-ebs: Waiting for the instance to stop...
==> amazon-ebs: Creating the AMI: windows-ami-01
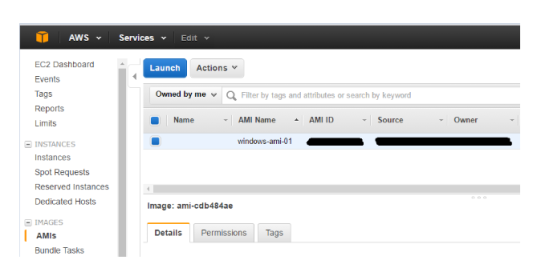
    amazon-ebs: AMI: ami-cdb484ae
==> amazon-ebs: Waiting for AMI to become ready...
==> amazon-ebs: Terminating the source AWS instance...
==> amazon-ebs: Cleaning up any extra volumes...
==> amazon-ebs: No volumes to clean up, skipping
==> amazon-ebs: Deleting temporary keypair...
Build 'amazon-ebs' finished.
==> Builds finished. The artifacts of successful builds are:
--> amazon-ebs: AMIs were created:
ap-southeast-2: [AMI ID here]


Congratulations! You have successfully created an based AMI which we can now use create an instance from using Vagrant. If the output got stuck on “Waiting for WinRM” (more than a few minutes) then see the section below.

Debugging when something goes wrong

AWS has a number of useful tools to let you know what state the instance is in. When and AWS instance is running, navigate to the EC2 section of the AWS Dashboard:


d1

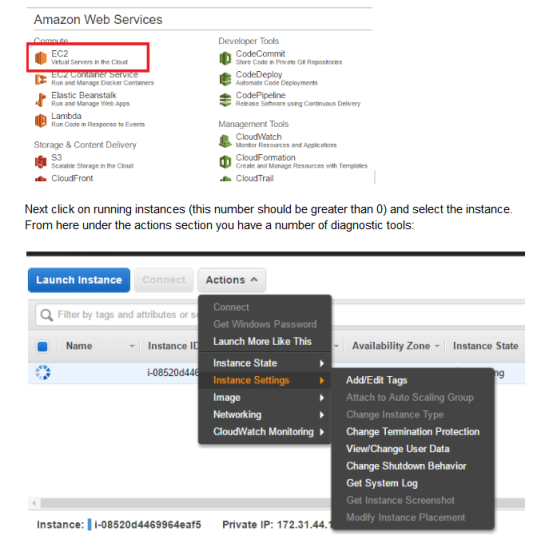
View/Change User Data: Allows you to edit what the instance will do once it has been launched. This is the same information contained in bootstrap-aws.txt file referenced in our Packer file. It can help to remove sections in here to see at what point there is a problem with the file.

Get System Log: Allows you to view data on the instance starting up to ensure there are no errors

Get Image Screenshot: This will grab a screenshot of your actual running instance. This can highlight of the instance is still starting up, is at the login screen or an error has occurred.


I Cannot log into the instance i have created using the Packer file

It is very likely that the password you created in the aws.json file and the bootstrap-aws.txt or either too simplistic or do not match. If this step fails then the rest of the bootstrap-aws.txt will not execute and you will be stuck on the waiting for WinRM process when “running packer build aws.json”

Stage 2: Using Vagrant to create an AWS instance from the AMI we created

What we have done so far is create an AMI (Amazon Machine Image) which we have customized so that:

  • WinRM communication is possible
  • We have installed a Chef client to enable us to install more software onto the instance.

The next part of the tutorial will spin up an AWS instance using our AMI and then install SQL server CE onto it using Chef

First create a folder called vagrantAWS and in this folder create a file called “Vagrantfile” (no extension)
Next in the Vagrantfile paste in the following text:

  Vagrant.configure("2") do |config|  
  config.vm.box = "dummy"
  config.vm.box_url = "https://github.com/mitchellh/vagrant-aws/blob/master/dummy.box?raw=true"

  config.vm.provider :aws do |aws, override|
    aws.access_key_id = "[AWS ACCESS KEY YOU CREATED IN FIRST PART OF THE TUTORIAL]"
    aws.secret_access_key = "[AWS SECRET KEY YOU CREATED IN FIRST PART OF THE TUTORIAL]"

    aws.ami = '[ID OF AMI YOU CREATED]'
    aws.instance_type = 't2.micro'
    aws.region = '[SAME AS IN PACKER FILE]'
    aws.subnet_id = '[SAME AS IN PACKER FILE]'
    aws.security_groups = ['[SAME AS IN PACKER FILE]'] 

    # https://github.com/mitchellh/vagrant-aws/issues/340
    override.nfs.functional = false # workaround for issue 340
    override.winrm.username = "Administrator"
    override.winrm.password = "[SAME AS IN PACKER FILE]"
    override.vm.communicator = :winrm
  end

 config.vm.provision :chef_solo do |chef|
    chef.add_recipe "windows"
    chef.add_recipe "sqlce"
    chef.file_cache_path = 'c:/var/chef/cache' 
  end
end 


ID OF AMI YOU CREATED: At the end of the the successful run of ‘packer build aws.json’ you would have seen the following line:

–> amazon-ebs: AMIs were created:
ap-southeast-2: [ID OF AMI]
You can also find the ID of the AMI you created here in the EC2 dashboard:

d1

What the Vagrantfile is doing

Firstly is it solving a number of known issues with Vagrant and AWS by creating a dummy image and also overriding the WinRm settings. The it is using the Chef recipe sqlce to install SQLCE onto the AWS instance.


Some Chef preparation:

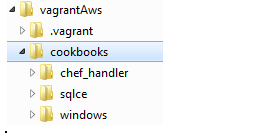
In order to provision the AWS instance with SQLCE you will need to download the cookBook. First we need to create a cookbooks folder in the VagrantAws folder on your local machine.


Next download the SQLCE chef cookBook from here (and extract them to the cookbooks folder):

https://supermarket.chef.io/cookbooks/sqlce

You will also require the Windows cookbook which can be downloaded from here:

https://supermarket.chef.io/cookbooks/windows


You will also need Chef_handler:

https://supermarket.chef.io/cookbooks/chef_handler

You need to make sure you select the compatible versions in order for the tutorial to work. This can be done using the dropdown:

d1

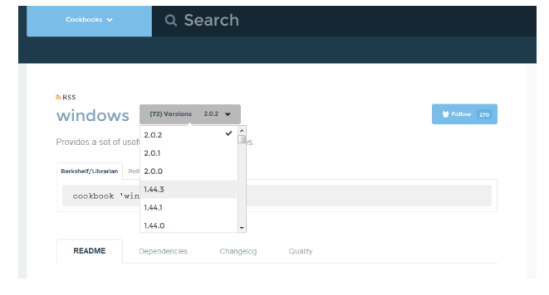
The versions you will need are

Windows – 1.36.1

SQL CE – 1.0.0

Chef_handler – 2.0.0

You will need a tar.gz extractor tool (recommend downloading WinRAR) to extract the file in the cookbooks folder.

Once you have download the recipes you should have the following structure:

d1

Next we’re going to execute the Vagrant file. To do this open a command prompt and navigate to the VagrantAws folder. Then type vagrant up
You should then see the following output:

 C:\vagrantAws>vagrant up
Bringing machine 'default' up with 'aws' provider...
==> default: Auto-generating node name for Chef...
==> default: Warning! The AWS provider doesn't support any of the Vagrant
==> default: high-level network configurations (`config.vm.network`). They
==> default: will be silently ignored.
==> default: Warning! You didn't specify a keypair to launch your instance with.

==> default: This can sometimes result in not being able to access your instance
.
==> default: Warning! You're launching this instance into a VPC without an
==> default: elastic IP. Please verify you're properly connected to a VPN so
==> default: you can access this machine, otherwise Vagrant will not be able
==> default: to SSH into it.
==> default: Launching an instance with the following settings...
==> default:  -- Type: t2.micro
==> default:  -- AMI: ami-cdb484ae
==> default:  -- Region: ap-southeast-2
==> default:  -- Subnet ID: subnet-
==> default:  -- Security Groups: ["       "]
==> default:  -- Block Device Mapping: []
==> default:  -- Terminate On Shutdown: false
==> default:  -- Monitoring: false
==> default:  -- EBS optimized: false
==> default:  -- Source Destination check:
==> default:  -- Assigning a public IP address in a VPC: false
==> default:  -- VPC tenancy specification: default
==> default: Warning! Vagrant might not be able to SSH into the instance.
==> default: Please check your security groups settings.
==> default: Waiting for instance to become "ready"...
==> default: Waiting for SSH to become available...
==> default: Machine is booted and ready for use!
==> default: Uploading with WinRM: C:/vagrantAws => /vagrant
==> default: Uploading with WinRM: C:/vagrantAws/cookbooks => C:/vagrant-chef/00
7eb444ff2fed7194a88655264e3bee/cookbooks
==> default: Running provisioner: chef_solo...
==> default: Detected Chef (latest) is already installed
==> default: Generating chef JSON and uploading...
==> default: Running chef-solo...
==> default: Starting Chef Client, version 12.4.2
==> default: [2016-09-28T06:49:19+00:00] INFO: *** Chef 12.4.2 ***
==> default: [2016-09-28T06:49:19+00:00] INFO: Chef-client pid: 504
==> default: [2016-09-28T06:50:01+00:00] INFO: Setting the run_list to ["recipe[
windows]", "recipe[sqlce]"] from CLI options
==> default:
==> default: [2016-09-28T06:50:01+00:00] INFO: Run List is 
, rec ipe[sqlce]] ==> default: [2016-09-28T06:50:01+00:00] INFO: Run List expands to [windows, sql ce] ==> default: [2016-09-28T06:50:01+00:00] INFO: Starting Chef Run for vagrant-9a2 f8af8 ==> default: [2016-09-28T06:50:01+00:00] INFO: Running start handlers ==> default: [2016-09-28T06:50:01+00:00] INFO: Start handlers complete. ==> default: Compiling Cookbooks... ==> default: ==> default: [2016-09-28T06:50:01+00:00] WARN: You are overriding windows_packag e on {:os=>"windows"} with Chef::Resource::WindowsCookbookPackage: used to be Ch ef::Resource::WindowsPackage. Use override: true if this is what you intended. ==> default: [2016-09-28T06:50:01+00:00] WARN: chef_gem[win32-api] chef_gem comp ile_time installation is deprecated ==> default: [2016-09-28T06:50:01+00:00] WARN: chef_gem[win32-api] Please set `c ompile_time false` on the resource to use the new behavior. ==> default: [2016-09-28T06:50:01+00:00] WARN: chef_gem[win32-api] or set `compi le_time true` on the resource if compile_time behavior is required. ==> default: Recipe: windows::default ==> default: * chef_gem[win32-api] action install ==> default: [2016-09-28T06:50:04+00:00] WARN: chef_gem[win32-service] chef_gem compile_time installation is deprecated ==> default: ==> default: [2016-09-28T06:50:04+00:00] WARN: chef_gem[win32-service] Please se t `compile_time false` on the resource to use the new behavior. ==> default: [2016-09-28T06:50:04+00:00] WARN: chef_gem[win32-service] or set `c ompile_time true` on the resource if compile_time behavior is required. ==> default: * chef_gem[win32-service] action install ==> default: [2016-09-28T06:50:05+00:00] WARN: chef_gem[windows-api] chef_gem co mpile_time installation is deprecated ==> default: ==> default: [2016-09-28T06:50:05+00:00] WARN: chef_gem[windows-api] Please set `compile_time false` on the resource to use the new behavior. ==> default: [2016-09-28T06:50:05+00:00] WARN: chef_gem[windows-api] or set `com pile_time true` on the resource if compile_time behavior is required. ==> default: * chef_gem[windows-api] action install ==> default: [2016-09-28T06:50:05+00:00] WARN: chef_gem[windows-pr] chef_gem com pile_time installation is deprecated ==> default: ==> default: [2016-09-28T06:50:05+00:00] WARN: chef_gem[windows-pr] Please set ` compile_time false` on the resource to use the new behavior. ==> default: [2016-09-28T06:50:05+00:00] WARN: chef_gem[windows-pr] or set `comp ile_time true` on the resource if compile_time behavior is required. ==> default: * chef_gem[windows-pr] action install ==> default: [2016-09-28T06:50:05+00:00] WARN: chef_gem[win32-dir] chef_gem comp ile_time installation is deprecated ==> default: ==> default: [2016-09-28T06:50:05+00:00] WARN: chef_gem[win32-dir] Please set `c ompile_time false` on the resource to use the new behavior. ==> default: [2016-09-28T06:50:05+00:00] WARN: chef_gem[win32-dir] or set `compi le_time true` on the resource if compile_time behavior is required. ==> default: * chef_gem[win32-dir] action install ==> default: [2016-09-28T06:50:05+00:00] WARN: chef_gem[win32-event] chef_gem co mpile_time installation is deprecated ==> default: ==> default: [2016-09-28T06:50:05+00:00] WARN: chef_gem[win32-event] Please set `compile_time false` on the resource to use the new behavior. ==> default: [2016-09-28T06:50:05+00:00] WARN: chef_gem[win32-event] or set `com pile_time true` on the resource if compile_time behavior is required. ==> default: * chef_gem[win32-event] action install ==> default: [2016-09-28T06:50:06+00:00] WARN: chef_gem[win32-mutex] chef_gem co mpile_time installation is deprecated ==> default: ==> default: [2016-09-28T06:50:06+00:00] WARN: chef_gem[win32-mutex] Please set `compile_time false` on the resource to use the new behavior. ==> default: [2016-09-28T06:50:06+00:00] WARN: chef_gem[win32-mutex] or set `com pile_time true` on the resource if compile_time behavior is required. ==> default: * chef_gem[win32-mutex] action install ==> default: Converging 9 resources ==> default: ==> default: * chef_gem[win32-api] action install ==> default: * chef_gem[win32-service] action install ==> default: * chef_gem[windows-api] action install ==> default: * chef_gem[windows-pr] action install ==> default: * chef_gem[win32-dir] action install ==> default: * chef_gem[win32-event] action install ==> default: * chef_gem[win32-mutex] action install ==> default: Recipe: sqlce::default ==> default: * windows_reboot[5] action nothing (skipped due to action :nothin g) ==> default: * windows_package[Microsoft SQL Server Compact 4.0 SP1 x64 ENU] a ction install ==> default: [2016-09-28T06:50:08+00:00] INFO: Installing windows_package[Micros oft SQL Server Compact 4.0 SP1 x64 ENU] version latest ==> default: ==> default: Recipe: ==> default: * remote_file[c:/var/chef/cache/SSCERuntime_x64-ENU.exe] action create ==> default: - create new file c:/var/chef/cache/SSCERuntime_x64-ENU.exe[2 016-09-28T06:50:08+00:00] INFO: remote_file[c:/var/chef/cache/SSCERuntime_x64-EN U.exe] updated file contents c:/var/chef/cache/SSCERuntime_x64-ENU.exe ==> default: ==> default: ==> default: - update content in file c:/var/chef/cache/SSCERuntime_x64-EN U.exe from none to 29e5ff ==> default: (new content is binary, diff output suppressed) ==> default: [2016-09-28T06:50:08+00:00] INFO: Starting installation...this coul d take awhile. ==> default: ==> default: ==> default: [2016-09-28T06:50:52+00:00] INFO: Chef Run complete in 51.560831 se conds ==> default: [2016-09-28T06:50:52+00:00] INFO: Skipping removal of unused files from the cache ==> default: ==> default: Running handlers: ==> default: [2016-09-28T06:50:52+00:00] INFO: Running report handlers ==> default: Running handlers complete ==> default: [2016-09-28T06:50:52+00:00] INFO: Report handlers complete ==> default: Chef Client finished, 2/16 resources updated in 98.902977 seconds C:\vagrantAws>

If you see the message Chef Client finished then congratulations! You have created an AWS using Vagrant and Chef based on an AMI that you customized.

Once you’re finished with the Vagrant instance make sure you type the command Vagrant destroy to ensure your instance is terminated and you are not charged by Amazon.

Using Java Remote Method Invocation

Overview

This arctile is a slightly off topic from the normal themes but worth writing about as it’s a tricky subject. The content below is from some slides i produced:

Agenda

•Introduction
•Why Use RMI
•Overview Of RMI
•Sample App
•Gotchas
•More reading

Introduction

•Remote Method Invocation allows method calls to be made from one Java Virtual Machine (JVM) to another JVM
•Operates A Client/Server Model where The Server ‘registers’ classes it wishes to be available for clients to access

Why Use RMI

•Removes the complexity of using Sockets to communicate
•Allows a level of control over which objects you can access
•Makes it easier to simulate real life client/server scenarios
•Lends itself well to TDD

Overview Of RMI

•RMI Registry – holds a list of stub references which have be registered by server application
•Server application – defines interfaces and concrete implementations to be registered on RMI Registry
•Client application – connects to the RMI registry in order to make use of servers classes

Overview Of RMI

overview

Sample Code: Server Application

sampleServer


Sample Client Application:

sampleClient

Gothcas:

•How do you make the compile classes available without copying them – use a webserver and have the client code download the classes dynamically
•Connection refused when running clientApp: Check serverApp is running first
•Class not found in client project: make sure you have copied the latest copy of your serverAppImpl.class to the client project
•Class not found exception when running client: ensure on the server application you have imported all of the classes your serverApp requires
More Reading


Setting Up Jenkins Using A Git Server Part1

This article contains information on how to set up Jenkins continuous integration which checks out code from a Git server. This first part of the series focuses on getting the Git server up and running and being able to check in code into a test project.

Requirements:

These instructions are for setting up a Git server on a Linux environment only. The process of doing this in windows is distinctly different and I’ve not had much experience with this.

You will need:

– a Linux machine (preferably running Ubuntu)

– an Internet connection

Step 1) remove your ssh keys folder. This folder can be found in /home/[username]/.ssh. The problem with installing Git on a machine which already has ssh keys setup correctly is that your can enter a state where you cannot checkout git projects due to a mismatch of keys. I’ll explain more on how SSH is related to Git further down in this article.

Step 2) open a terminal and type the following: (can be skipped if you know you have openssh-server installed on your machine)

sudo apt-get install openssh-server

This application is responsible for generating public and private keys so you can talk to the Git server

if this command fails try updating your software repositories

Step 3) In the same terminal type the following command

ssh-keygen -t rsa

you will get the following message:

Identity added: /home/[username]/.ssh/id_rsa (/home/[username]/.ssh/id_rsa)

this command translates as generate me a public and private key of type RSA

It will ask you a series of questions, just press enter for each of them. This will now have generated a public and private key in your home/[username]/.ssh folder. check to confirm. you should have  a file id_rsa.pub

Step 4) Next in the terminal type ssh-add. This will add your key to the system so it can be recognized by other applications

Step 5) now we’re going to install the Git server. Type in the terminal

sudo apt-get install  git-core gitosis

Git core is the fundamental packages needed for Git and gitosis is the git server

Step 6) Now we’re going to configure the Git server. The first thing we need to do is set up a default username which can access the git server. In order to do this we need to tell the Git server where are ssh public key is that we generated in step 3

Type the following command

sudo -H -u gitosis gitosis-init < /home/[username]/.ssh/id_rsa.pub

this translates as initialize the git server with the username gitosis and it’s ssh public key can be found in the folder  /home/[username]/.ssh/id_rsa.pub

you will get the following message:

Initialized empty Git repository in /srv/gitosis/repositories/gitosis-admin.git/
Reinitialized existing Git repository in /srv/gitosis/repositories/gitosis-admin.git/

Step 7) Next we’re going to make changes to the git server admin repository so we can create a new project on the git server. The git server admin repository is a git repository which controls access to all other projects you create on the git server

Step 8) navigate to your home folder

Step 9) type the following command in the terminal: git clone gitosis@[your ip address]:gitosis-admin.git

The git clone command makes a copy of the gitosis-admin repo. gitosis is the username you created when you initialized the git server. gitosis-admin.git is the name of the git repo you’re cloning

you will get the following messages if successful.

Cloning into gitosis-admin…
The authenticity of host ‘192.168.1.80 (192.168.1.80)’ can’t be established.
ECDSA key fingerprint is d5:35:6c:ed:73:67:cd:a4:32:42:8d:d4:6c:e5:b8:09.
Are you sure you want to continue connecting (yes/no)? yes
Warning: Permanently added ‘192.168.1.80’ (ECDSA) to the list of known hosts.
remote: Counting objects: 5, done.
remote: Compressing objects: 100% (4/4), done.
Receiving objects: 100% (5/5), 778 bytes, done.
Resolving deltas: 100% (1/1), done.
remote: Total 5 (delta 1), reused 5 (delta 1)

If you get a message asking for a password then the ssh stage part of this article has not worked. At this point i would recommend removing your keys and generating them again. don’t forget to type ssh-add once you have created the keys

Step 10) type ls and you should have the following folder structure in the gitosis-admin folder:

gitosis.conf

keydir

The gitosis.conf file is used for setting up new git users and projects. The key dir is where all of the users ssh public keys are stored. In order for a user to be able to access a project they need the name of their public key added to the gitosis.conf file and they need their public ssh key put into the keydir folder and checked in. I will show both of these processes next

Step 11) type the following command in the terminal: sudo gedit gitosis.conf. This will open up the gitosis.conf file in a text editor. you can use an alternative to gedit if you choose. The structure of the file will look like this:

[gitosis]

[group gitosis-admin]
members = james@james-machine
writable = gitosis-admin

This translates as follows:

[group gitosis-admin] //username group
members = james@james-machine  //name of the user currently logged on whose public  key we added when we initialized the git server
writable = gitosis-admin //name of the git repo we make changes to

so lets create a new git project and see if we can make changes to it. Enter the following into the gitosis.conf file

[group testGroup]
members = james@james-machine
writable = testproject

save the file and type the following at the terminal git status. You should the following message:

# On branch master
# Changes not staged for commit:
#   (use “git add <file>…” to update what will be committed)
#   (use “git checkout — <file>…” to discard changes in working directory)
#
#    modified:   gitosis.conf
#
# Untracked files:
#   (use “git add <file>…” to include in what will be committed)
#
#    gitosis.conf~
no changes added to commit (use “git add” and/or “git commit -a”)

This translates as you’ve made changes to the gitosis.conf file but they have not been committed to the gitosis-admin repo. This is what we will do next.

Step 12) Type the following: git commit -am “i made my first git project”

you will get the following message

1 files changed, 4 insertions(+), 0 deletions(-)

-a means add the file to the git commit changes list

-m means message, adding a message with each commit you make is essential

Then type git push. This takes the local changes you made to the git admin repo and pushes them to the git server

Step 13) Next we’re going to check out the new empty git project, make changes and commit them to the test project.  Navigate to your home folder and type the following:

git clone gitosis@[ip address of machine]:testproject.git

Cloning into testproject…
Initialized empty Git repository in /srv/gitosis/repositories/testproject.git/
warning: You appear to have cloned an empty repository.

read error of repo means you haven’t pushed the changes

Step 14) Now we’re going to make changes to our test git repository. create a new text file in the folder testproject then type git status. You should see the following message

# On branch master
#
# Initial commit
#
# Untracked files:
#   (use “git add <file>…” to include in what will be committed)
#
#    a.txt
nothing added to commit but untracked files present (use “git add” to track)
This means you have a file in the folder which is not currently tracked by the git repo.

Step 15) Type git add .   (include full stop) This adds the file to the change list of the git repo so it will be tracked

Step 16) Next type git commit -am “Creating first file in test project”. This command makes a local commit to the git repository with a message. you should see the following message

0 files changed, 0 insertions(+), 0 deletions(-)
create mode 100644 a.txt

This has made a local change to your git repository but will still need to push it to the git server. Type git push gitosis@[ip address]:testproject.git master

and you will get the following message

Counting objects: 3, done.
Writing objects: 100% (3/3), 245 bytes, done.
Total 3 (delta 0), reused 0 (delta 0)
To gitosis@192.168.1.89:testproject.git
* [new branch]      master -> master

This has created a new branch on in the test project called master and checked in your code

The next article will focus on adding multiple users from different machines to your test project to allow other people to check into your test project


Webdriver Advanced usage tutorial

In this post i talk about the more complex usages of WedDriver which you will inevitably have to face when creating automated tests. If you are new to webdriver i would recommend reading my webdriver basics tutorial first which can be found here

The topics i’m going to discuss are:

– staleElementException explained

– waiting for elements to appear on the page

– testing pages which involve AJAX

StaleElementException explained

Sooner or later you’re going to come across this webdriver exception when you are using driver.findBy() or using WebElement to perform some function on the page. So what does this actually mean ? So this exception is thrown when you are trying to do something on the page which has already changed state since your previous webdriver command. An example of this could be grabbing the items in a dropdown box and then trying to click on one of these items when the dropdown is no longer on the page (either because webdriver has navigated to another page or that item is no longer in the list)

So how can you avoid this? The techniques below will help reduce the likelihood of this occurring. One quick fix is to grab a new instance of the page when the exception is thrown in your tests where this happens often. This means that you have got the ‘most current’ state of the webpage. This should highlight whether or not you should be waiting for other actions to complete on the page first.

Waiting For Elements To Appear On The Page

Another common exception you will face is ElementNotFoundException. This is where webDriver cannot find the element you are looking for even though you know it’s on the page.  This happens because webDriver is not waiting for the element to appear on the page and has received a Dom complete operation from the page. This can happen when you are trying to find elements on the page which involve Javascript. The solution to this problem is to use a polling mechanism on these elements. The code below will continually poll the page every 500ms for 30 seconds waiting for an element to displayed.  This gives enough time for all of the Javascript to complete on the page. As soon as the element appears, the method will return.

public static ListwaitUntilPageLoadedListWebElements(WebDriver driver, By by) {
int pollCount=0;
while (pollCount<sleeptimeout) {
try{
Thread.sleep(250);
List<WebElement> elements =driver.findElements(by);
if(elements.size()>1 ) {
return elements=driver.findElements(by);
}
}catch (Exception e) {
pollCount=pollCount+250;
System.out.println(“waiting for element”);
}
}
return null;
}

The above code will continually poll for an element to be present until the timeout is reached or the element is found. I’ve passed in a ‘By’ as a parameter which means that you could find by id, find by linktext, classname etc

Testing Pages Which Involve AJAX

Webdriver has no idea when AJAX has completed so could return a documentReady state when AJAX is still progressing on the page. An example of this could be that documentReady has been returned but AJAX on the page is still adding and removing elements on the page. This can lead to both elementNotFound and staleElement exceptions thrown by webDriver. One solution to this problem is to insert a custom element into the dom and wait for it to be removed by AJAX. This will let you know that AJAX has finished updating the page and has removed your custom element

WebDriver driver;

JavascriptExecutor js = (JavascriptExecutor) driver;

js.executeScript(“document.getElementById(‘myDiv’).appendChild(document.createTextNode(‘ WaitForAJax’))”) //code to add custom element to the DOM

private void verifyAJaxCompleted() throws Exception{
int sleeptimeout=30000;
int pollCount=0;
while (pollCount<sleeptimeout) {
Thread.sleep(250);
WebElement element =driver.findElement(By.id(“search-gen-res”));
if(element.getText().contains(“WaitForAjax”) ) {
pollCount=pollCount+250;
System.out.println(“waiting for AJax To Complete”);;
}else {
return;
}
}
throw new Exception(“Ajax Update Did not Complete Within 30s”);
}

so the code above creates a custom txt element to the node “search-gen-res”. The method waitForAjax method will return one the custom element is no longer present. If the element did not get removed from the page during the AJAX request then an exception is thrown

Summary

This arcticle touches on some of the more advanced features of webdriver when using feature rich webpages and explains how to avoid staleElementExceptions

Website Testing 101 – Webdriver basic usage tutorial

In this day and age, websites are complex and are changing all the time. A software tester cannot simply perform manual regression testing on a new piece of functionality without having some reliance on automated tests. There are a number of tools out there each with their own benefits but this article will be focusing on the one which I’ve had most experience: Webdriver. The aim of this article is to get you up and running quickly with using this tool.

So what is Webdriver?

Webdriver allows you to simulate actions performed by a user and then verifying the state of the page after actions have been performed. This can be done using a virtual browser (also called a headless browser) or by physically opening a browser on the user’s desktop to perform the actions a typical user would (e.g., clicking on links, selecting items in a drop-down list etc). The headless browser is unable to perform any actions which require JavaScript to be executed on the page. The benefit of the headless browser is that it’s much faster than opening a physical browser and does provide a close enough environment akin to a real browser.

What do i need to use Webdriver?

you will need the following:

– Latest version of Java SDK: Java SDK  (Webdriver can be used with out languages but my preference is Java)

– An IDE: I would recommend Intellij IDEA as it’s awesome: IntelliJ IDEA

– Webdriver JAR’s: Webdriver JAR

– Latest Version Of Firefox (Other browsers can be used by I’m going to focus on Firefox for this tutorial)

– Firebug add-on for Firefox.

Setting up your environment

Step 1: download all of the above files

Step 2: Create a new project and import the Webdriver jar into it

How Webdriver and website testing works

So before we dive in a write some code i need to give an overview of what we’re going to use Webdriver for in terms of Website testing. Webdriver works by looking for elements on the page, interacting with them and verifying the outcome of the interaction is correct.

An element can be something like a button, a link on a page, a checkbox etc. By interacting with them i mean the following:

– Checking if is on the page

– Checking the status of an element (e.g. if a checkbox is disabled)

– Clicking on an element to perform some other action

The final part is verifying the outcome. We do this by performing assert statements at the end of the interaction. Asserting something is verifying an element is in the state you expect it to be. Examples of these can be AssertTrue, AssertEqual, etc. Asserting statements are included within the Webdriver Jar

A very simple example

So the first thing we’re going to do is make sure that the Jar file has been imported correctly into your project and that you can load a Firefox browser. Copy and paste the following code into your IDE:

import org.openqa.selenium.WebDriver;
import org.openqa.selenium.firefox.FirefoxDriver;
import org.openqa.selenium.firefox.FirefoxProfile;

public class AppInit {
public static void main(String args[]) {
WebDriver driver= new FirefoxDriver(new FirefoxProfile());
}
}

If you get any errors regarding classes not found then you have not imported the selenium jar correctly. Not only do you have to import the single jar but also ALL the jars in the lib folder. Run this code and it should load a Firefox browser at the end of it. So lets look over the code:

WebDriver driver= new FirefoxDriver(new FirefoxProfile());

so WebDriver is an interface that other classes implement (e.g. FirefoxDriver) so it cannot be instantiated. The FirefoxDriver takes an argument of a FirefoxProfile. The FirefoxProfile allows you customize what type of Firefox Browser is loaded (e.g. a non caching browser). In this example i have loaded a default profile.

Lets look some more basic commands:

driver.get(URL) //allows you to navigate to different pages

driver.findElement(By) // allows you to find elements on the page you are interested in. Remember, an element can be a dropdown menu, a button etc. A few examples of finding an element are find by ID, by Name, by Link Text. We’ll go into more detail on this later.

driver.findElements(By) // when there is more that one item with the same name/id then you can store them in an array

driver.close() //closes the firefox browser

WebElement //once you have found the element you are looking for, you can assign it to a WebElement object. This then allows you to perform operations on it such as clicking, sending text to it, checking if it is disabled etc

So lets put all of this together into another example:

import org.openqa.selenium.By;
import org.openqa.selenium.Keys;
import org.openqa.selenium.WebDriver;
import org.openqa.selenium.WebElement;
import org.openqa.selenium.firefox.FirefoxDriver;
import org.openqa.selenium.firefox.FirefoxProfile;

public class AppInit {
public static void main(String args[]) {
WebDriver driver= new FirefoxDriver(new FirefoxProfile());
driver.get(“http://www.amazon.co.uk&#8221;);
WebElement element= driver.findElement(By.id(“twotabsearchtextbox”));
element.sendKeys(“kindle”);
element.sendKeys(Keys.ENTER);
}
}

So this code is navigating to the amazon website, finding the search box by id and then performing a kindle search. But how did you know the id of the search box i hear you ask? This is where firebug comes into play. So I went to the amazon homepage manually, right clicked on the search box and selected inspect element with firebug. I was then presented with the following image below:

As you can see from the image it has input id=”” . This is what I’m searching for when using driver.findElement(By.id()). I would recommend using finding by id’s rather than link text as they are less like to change.

So the final part of the example is using asserts. This is making sure that the actions you have performed actually produce the desired outcome. Again we’re going to stick with the amazon example but add some verification steps too:

import org.openqa.selenium.By;
import org.openqa.selenium.Keys;
import org.openqa.selenium.WebDriver;
import org.openqa.selenium.WebElement;
import org.openqa.selenium.firefox.FirefoxDriver;
import org.openqa.selenium.firefox.FirefoxProfile;
import java.util.List;

import static org.testng.Assert.assertEquals;

public class AppInit {
public static void main(String args[]) {
WebDriver driver= new FirefoxDriver(new FirefoxProfile());
driver.get(“http://www.amazon.co.uk&#8221;);
WebElement element= driver.findElement(By.id(“twotabsearchtextbox”));
element.sendKeys(“kindle”);
element.sendKeys(Keys.ENTER);

List<WebElement> elements =driver.findElements(By.className(“number”));
assertEquals(16,elements.size());
}
}

So in the last 2 steps we’re looking for the number of results on the page and asserting that the number of search results on the page is 16. If this changed for any reason then the assert statement would fail. Try it yourself, change the assertEqual to 17 and see what happens. Other asserts you could have used here are checking the page URL is correct by writing assertEquals(“User is not on the correct page”,”http://amazon.co.uk/search&#8221;,driver.getCirrentURL())

Summary

So this article has talked about the need for automated testing and a basic introduction on how to perform this using WebDriver. The next article in this series will look at more advanced features including waiting for elements to be displayed and polling for elements to be in the correct state

Ignorance is not bliss when it comes to your build pipeline

So I get asked every now and then “who needs to know how the build pipeline works?” The answer is “everyone”. Ignorance in this area can be costly in terms of time for your build pipeline. Without knowing how it works means the mentality of “it’s always done that, not sure why” sets in and then people become afraid of changing it.

A classic example happened on the project I’m working on. The team hadn’t looked at the build pipeline in a long time. So they didn’t know that their build and package stage was checking out the whole repository into Teamcity every time a commit was made, as opposed to only checking out the updated files. This one modification knocked off 4 minutes from every build. Now I know that doesn’t sound much but the saving does add up:

  • 5 commits per day (average) 20 minutes
  • Time saved per week: 1hr 20 minutes
  • Time saved per month: 5.3 hrs
  • Time saved per year: 64 hours!


So why not take a look through your build configuration today. You never know what you might find there.

Setting Up Jenkins Using A Git Server Part2

This article will be focusing on setting up multiple users in your test git project so they can access it from different machines. If you have not read part one you can find it here

Note: these instructions are for Linux only i’m afraid

Step 1) You need to create a ssh public key on the machine you wish to connect to the git server. For an overview of how ssh works and setting up ssh on your machine you can find it here. This can be done with the following command:

ssh-keygen -t rsa

It will ask you a series of questions, just press enter for all of them. This would create your public key in your home/.ssh directory.

Step 2) Next we will make a copy of it so it has a more meaningful name (testMachine1.pub)

cp id_rsa.pub testMachine1.pub
ls
id_rsa  id_rsa.pub  known_hosts  testMachine1.pub

This should now be the contents of your .ssh folder

Step 3) Now we need to copy our new public key onto the machine which hosts the git server. This can be done via usb, email (as it;s your public key and not private) or using the Linux Cat command

For the linux cat command you will need to know the password of the machine hosting the git server.  More detailed info on using the cat command can be found here

for now copy the public key to the home folder running the git server

Step 4) Now on the git server machine copy the testMachine1.pub key to the keydir directory of the git server

cp /home/testMachine1.pub /home/gitosis-admin/keydir

your keydir directory should now have the original key which you used in part 1 to set up the git server and your new public key testMachine1.pub

Step 5) Next we need to edit the gitosis-admin.conf file to tell the git server we have added a new key to the keydir directory

gedit /home/gitosis-admin/gitosis.conf

This should be how your current config file should look from part1 of the article:

[gitosis]

[group gitosis-admin]
members = james@james-machine
writable = gitosis-admin

[group testGroup]
members = james@james-machine
writable = testproject

next add the text ‘testMachine1’ to the members part of the testGroup section so that your config file now looks like this (do not add the .pub extension of the file)

[gitosis]

[group gitosis-admin]
members = james@james-machine
writable = gitosis-admin

[group testGroup]
members = james@james-machine testMachine1
writable = testproject

save and close the file. When you type the following command the git server should have detected the following changes:

git status

# On branch master
# Changes not staged for commit:
#   (use “git add <file>…” to update what will be committed)
#   (use “git checkout — <file>…” to discard changes in working directory)
#
#    modified:   gitosis.conf

Step 6)Next we need to add testMachine1 key to the git change list so it’s tracked. Navigate to the keydir folder and type

git add .

Next we will commit our changes to the git server

git commit -am “adding new user to test project”

git push gitosis@[ipaddress]:gitosis-admin.git

Counting objects: 5, done.
Compressing objects: 100% (3/3), done.
Writing objects: 100% (3/3), 360 bytes, done.
Total 3 (delta 1), reused 0 (delta 0)
To gitosis@192.168.1.66:gitosis-admin.git
b00222d..26f4d4b  master -> master

Setp 7) Now we will test our new git user by making changes to our test project and commiting using the new git user testMachine1.This can be done on the git server machine or the machine which generated your new ssh public key testMachine1

First navigate to test project and make a change to an existing file.

cd /home/testproject

gedit a.txt

git status

# On branch master
# Changes not staged for commit:
#   (use “git add <file>…” to update what will be committed)
#   (use “git checkout — <file>…” to discard changes in working directory)
#
#    modified:   a.txt
#

Step 8) Finally commit your changes using the new userrname:

git commit -am “making changes using new username”

1 files changed, 1 insertions(+), 0 deletions(-)

git push testMachine1@[ipaddress of git server]:testproject.git

The next article will be downloading and starting jenkins as a CI environment

Estimating stories – How accurate can we be?

So i recently attended a skills matter conference by Linda Rising about estimating stories and how realistically we can be in estimating the size of them which was a real eye opener. A large chunk of it was focused of how our brains actually work and therefore influence how we estimate a chunk of work.The first major point that was made is that we lie to other people and ourselves all the time. This is not just regarding stories, but everything!  We tend to have a rose-tinted view of the world which we means that not only are we over optimistic about our abilities but also the abilities of others. This over optimism then unconsciously gets translated into our estimates. Comments like “oh that’s just a link on a page, that’ll be easy” and “oh we’ve done that before so it’ll be easier this time around” are common place in estimation sessions.

To set the scene of the next point I’ll talk about how people can estimate story sizes. So we use story points of 1,2,4,8. Other companies i know use Fibonacci (1,2,3,5 etc) or “small”, “medium” or “large”. So the next problem is that your imaginary number/size which is relative to other stories of similar size will then have mathematical functions performed on it (e.g. division, subtraction etc) which on an imaginary number, doesn’t hold much value. E.g. you estimate a story as a 4, it then may get split into 2 ‘equal’ stories of 2. Math operations such as this don’t work with an imaginary number created by an unconsciously over-optimistic estimator.

So before you start throwing estimation out of the window there is some hope! The first key point is that do not try to estimate too much, too far in  advance. The result will be inaccurate at best. You’re better off estimating on things you are working on right now, not 6 months down the line. The reason for this is that as you’re working on the story you’re gradually reducing the amount of ‘unknown’ elements to it which means you have a better idea of what work could be still outstanding. The next point to be made is that continually review your estimates as you’re working through the story. Estimates should be a continuous feedback loop to project managers to indicate if your story is on track or spiraling out of control and once your story has been completed, compare it with other stories which had the same estimate.

So to summarize:

  • As humans, we are over-optimistic liars to ourselves so PM’s add a bit of a buffer to the figure we come up with in estimates
  • Don’t estimate too much, too far in advance
  • Continuously review your estimates as you play the story

for those further interested in this topic, here’s the pod-cast: estimation & deception

Is It Ever Ok To Checkin On A Red Build?

We were having an interesting debate at work today as to whether or not it is ok to checkin on a red build. So we had the situation that we needed a release candidate in order for the QA team to test. The build status was red from our CI environment which was preventing a developer with fixes for the release candidate checking in. This had been the state for a couple of hours with situation not being resolved.  So i hear you say “why not just revert back to a green state to allow the developer to checkin on a green build ?” Well now throw into the mix the idea of flakey tests (a flakey test being one which fails sometimes but when you rerun it, it goes green). Now how far do you revert back to ? How would you know where a known good state was without removing all of the flakey tests ? How do we know that our current red build status is a manifestation of a number of flakey tests ?

So the decision was then made for the developer with his fixes to checkin on a red build and low and behold it eventually went green. Which sparked the debate, should we really have a blanket rule saying no checkins on red ?

Pros Of Allowing Developers Checking In On A Red Build

  • Developers do not feel frustrated whilst they wait for hours for a green build
  • Developers can practice small commits often to the CI environment
  • Their checkin may not cause additional failures
  • Stories not related to the release candidate can still proceed
  • Build status may be arbitrarily holding up developers if failure is not genuine

Cons Of Allowing Developers Checking In On A Red Build

  • Release candidate must be green before it can be release to live so may hinder progress
  • Relies on developers confidence that their additional checkin on red will not break anything else
  • Not starting from a known good state from a testing perspective
  • Problem of red build may become compounded if several developers all checkin at the same time
  • It may end up staying red for longer vs holding off for additional checkins

My personal opinion on this that if you have the following situation within your organization then it probably would be acceptable (not great) to check in on a red build:

  • A stable environment with no flakey tests
  • A close knit team not spread among multiple sites
  • No need for frequent release candidates
  • A small build time to allow for quick reverts
  • The ability to diagnose test failures quickly

i would be genuinely interested to see the number of firms which had this. I also realize that the elephant in the room in our organization is to fix the flakey tests to guarantee a build in a genuine failure.

When A Bug Is Not A Bug ?

So I guess we should start we should start by defining what a bug is from an academic perspective. So from the official ISEB stand point a bug is :

A flaw in a component or system that can cause the component or system to fail to perform its required function, e.g. an incorrect statement or data definition. A defect, if encountered during execution, may cause a failure of the component or system.

Source:http://softwareqatestings.com/introduction-to-software-testing/iseb-software-testing-glossary-d-to-l.html

Seems fairly straight forward right ? This is where the real world kicks in. Say you find an a defect on a system and you then show it to a product owner saying “hey I’ve found a defect”. The product owner replies “Oh, it’s not great but we don’t care about that affecting our system.” Still a defect then ? As this is a situation I’ve encountered myself I now have the belief that a defect is something that causes an unexpected behavior and affects something that the business cares about

Here’s another situation. You find an unexpected behavior and show it to a business analyst. The BA replies “Oh, I didn’t know that situation could happen in the system and we don’t have a requirement for that.” In this case it’s a new requirement rather than a behavior

So to summarize, a defect is not always a defect. A defect is something that affects business value which we already have a requirement for its defined behavior